Micrometer Screw Gauge Guide: A High Precision Inspection Tool
For many years, the basic handheld micrometer has advanced to feature vast varieties of point configuration and digital electronics. In the manufacturing space, the micrometer still stands as one of the most versatile and popular precision measuring tools. This is because, it provides direct size information, delivers high resolution, and it adapts so easily to a variety of measurement applications. As a result, this guide has deemed it to present everything you need to know about the micrometer screw gauge.
What is Micrometer Screw Gauge?
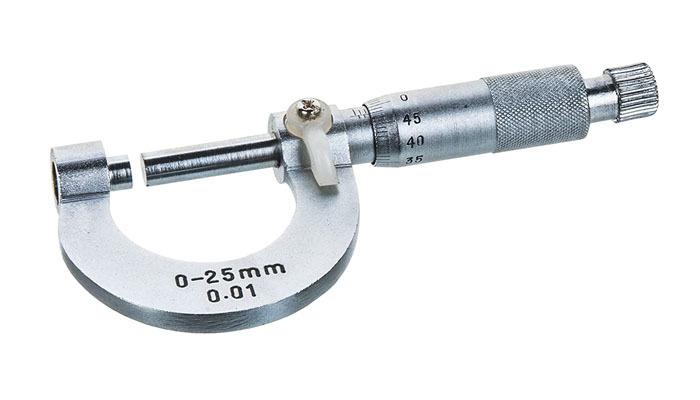
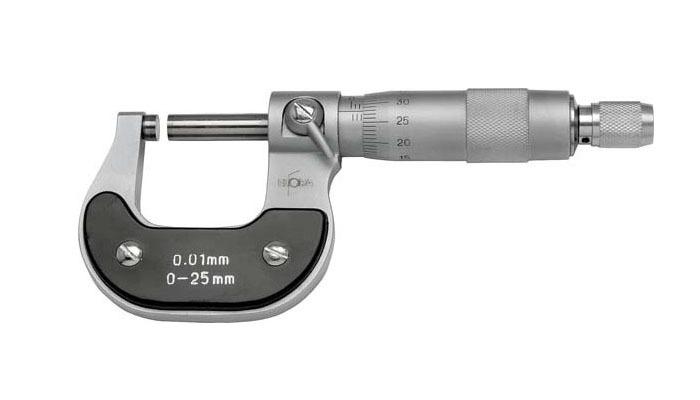
A micrometer screw gauge – also known as a micrometer is a precision measuring instrument that features a calibrated screw that is primarily used to measure small thickness or distance between two faces of the machining and mechanical engineering parts. Micrometer screw gauge is often used alongside other metrological devices such as Vernier, dial, and digital calipers. It is also used as a tool for measuring the apparent diameter of a microscopic object or celestial body in microscopes or telescopes.
Since the inception of micrometer screw gauge about 150 years ago, numerous variation of alternate contact point configurations has been developed. This is done to satisfy an endless number of measurement applications in vast varieties of fields. Consequently, these varieties of options for micrometers have made it a universal length-measuring hand tool in the manufacturing industry.
There are vast varieties of micrometers they include and are not limited to the following:
- Universal micrometer sets – feature interchangeable anvils including flat, spherical, spline, disk, blade, point, and knife-edge. A universal micrometer is a term used to refer to micrometers that feature modular components, allowing one part to function as depth mic, outside mic, step mic, and many more. They are mostly known as Mul-T-Anvil and Uni-Mike brand name.
- Blade Micrometer –features a matching set of narrow tips (blades) that allow measurement of a narrow o-ring groove.
- Pitch-diameter micrometer –features a matching set of thread-shaped tips for the measurement of the pitch diameter of screw threads
- Limit Mics –features two spindles and two anvils which are used like a snap gauge. The sample to be measured must pass through the first and the second gap and must be placed within specification. The two gaps depict an accurate reflection of the top and bottom of the tolerance range.
- Bore Micrometer –this type of micrometer features three anvil heads on a micrometer base with application in the measurement of inner diameters.
- Tube Micrometer –features a cylindrical anvil used to measure the thickness of tubes. Its anvil is located perpendicular to its spindle
What is the Function of a Micrometer Screw Gauge?

The micrometer screw gauge has a wide application in almost all fields of science such as in engineering, manufacturing, and in different scientific experiments. It is used to measure the value of vast varieties of objects up to higher precision and accuracy. So, for better understanding and to ensure proper use of micrometer screw gauges, it is imperative to know the function of its basic parts. Here are the parts and function of a micrometer screw gauge:
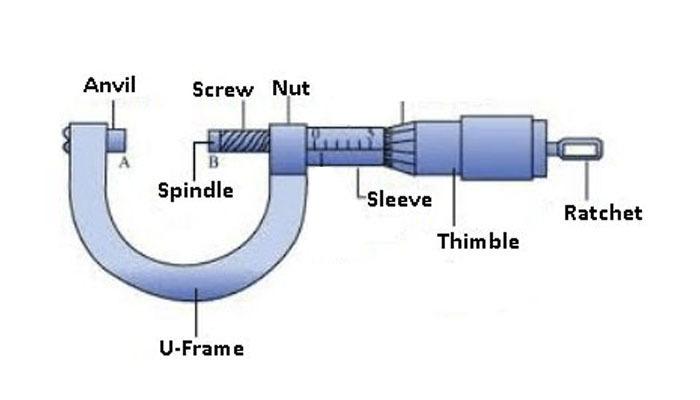
U-Frame
This part of a micrometer is a c-shaped frame which is a rigid part that features holding points for an object to be measured. The size of the u-shape frame depends on the range of measurement and it increases as the range of measurement expands to bigger sizes. The main function of the U-shape frame is to provide a basic structure of a micrometer on which the stationary anvil at one end and movable spindle slide outward or inward through the other end of the U-frame.
Zero Adjusting Screw
This is a screw located back end of the anvil which is used to adjust or correct the zero error of the micrometer. This helps to cancel a zero error if found before the measurement during the test.
Anvil
Anvil is a small stationary cylindrical part that is located far end of the c-frame which acts as a holding point for measuring samples or objects. Most users refer to it as one of the rigid measuring and holding points of a micrometer screw gauge.
Spindle
This is a cylindrical part of the micrometer mounted through all other parts such as the lock nut, sleeve, and thimble. It is moveable with a connection with the ratchet. As the ratchet is rotated either clockwise or anti-clockwise, the spindle slides inward or outward to adjust it with comparison to the measurement of the sample size.
Spindle and Anvil Face
The spindle and the anvil have a face and are located opposite each other. They are the measuring points of micrometer and constructed in such a way to hold the measuring ample or object collectively for measurement.
The Lock Nut
The mechanism of the micrometer screw gauge is based on precision ground threads of the spindle. As a result, the lock nut is fashioned to work as a stationary nut for this mechanism. The rotation of this mechanism into the lock nut on the micrometer controls the movement of the spindle.
Sleeve
The main function of the sleeve is for the indication of reading in millimeters (mm) in the case of an imperial micrometer. The sleeve on the micrometer is a barrel-type cylindrical component that is mounted on the spindle. The main scale of the micrometer screw gauge is engraved on the sleeve.
Thimble
The thimble is a component of a micrometer and it is mounted on the spindle. A scale is engraved on the thimble to show the measurement value of the sample or object to be measured in fraction.
The Ratchet
The ratchet is a knurled thumb grip component used to rotate the spindle into the desired direction during the measuring process provided with ratchet action. The ratchet action is done to avoid over-tightening of a micrometer across the sample or object of measurement. Also, it helps to ensure equal pressure force of every measurement.
What Are The Advantages Of Micrometer?
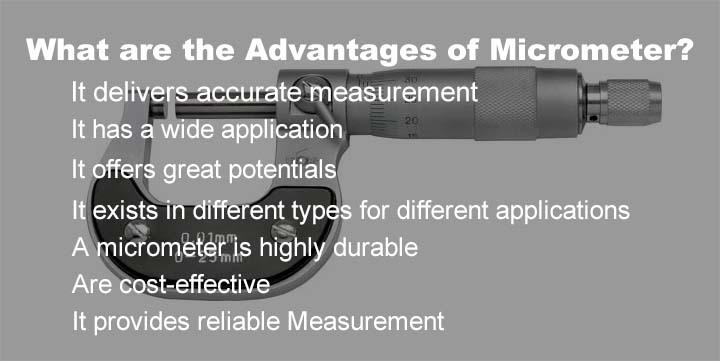
The micrometer is perceived generally to be an excellent precision measurement tool. As it is for vast varieties of tools, the micrometer screw gauge comes with impressive advantages. The advantages include and are not limited to the following:
- It delivers accurate measurement:the micrometer screw gauge is one of the most precise, quick, and accurate types of measuring devices available. While it exists in different varieties, most micrometers can measure up to 0.001mm or 0.0001 inches.
- It has a wide application:due to its simplicity, the micrometer screw gauge is widely used in vast varieties of industries including mechanical engineering, machining industry, manufacturing industries, and many more. As a result of its user-friendly operations, users can easily obtain accurate readings with having a bit of knowledge of this precision measuring tool.
- It offers great potentials:Each unit and part of the micrometer screw gauge is fitted with specialized equipment that serves specific tasks. Some of the specialized parts include the anvil and spindle tips that help to ensure more precision measurement according to the need of users’ applications.
- It exists in different types for different applications:the micrometer exists in vast varieties of types with specific applications. To obtain an accurate measurement of a particular distance, users must stick to the right micrometer for measurement. If this is not done, then such measurement may not be reliable for the project. For example, blade micrometers are applicable to measure shrouded features including grooves while paper thickness micrometers measure the thickness of a paper.
- A micrometer is highly durable:the micrometer is a durable measuring tool with a long-serving life span. It only requires investment at the onset of its purchase and afterward, users can reap its benefit over time. This is because users can use the tool multiple time and for different applications
- Are cost-effective:Large measuring tool is most expensive while the micrometer screw gauge is cost-effective for users who desires to take a large range of measurement. This is because this micrometer provides interchangeable anvils of different lengths that make it possible to measure different dimensions using a single frame.
- It provides reliable Measurement: the micrometer is made of the ratchet speeder/stop mechanism and integrated scales. The ratchet speeder/stop mechanism makes it possible for uniform pressure to be applied to the thimble to obtain reliable measurements that are reliable. Also, the micrometer features integrated scales such as the sleeve scale and thimble scales which helps to avoid the use of tape measure and ruler.
The Construction Of Micrometer Screw Gauge
Working Principle of Micrometer
The micrometer screw gauge working principle is based on the conversion of small distances into larger ones by measuring the rotation of the screw. This is done by using the “screw principle” to facilitate the reading of smaller distances on a scale after amplifying them.
To simplify the working principle further, let’s examine a typical screw with threads, and insert the screw by twisting its head. While inserting the screw, the thread of the screw rotates a specific number of times. Each rotation of the screw can be correlated to an equivalent axial movement which is referred to as the pitch or lead of the screw.
If all the threads of such a screw are constructed with a known constant pitch, then the amount of axial movement that can be generated can be traced easily on a scale. Consequently, the micrometer screw gauge uses the principle highlighted above to measure the dimension of samples and parts.
Construction
A micrometer screw gauge is made up of a “U” shaped metallic structure that is attached to a hollow cylindrical tube on one end of the tool. Inside the hollow tube is the uniformly threaded nut. Into this nut, a long stud with a plane face is fitted. Also, on the other end of the “U” shaped frame, at the exact opposite side of this nut, a smaller stud with the plane face is attached. The faces of the two studs are situated exactly parallel to each other.
The “U” shaped metallic structure is referred to as the frame of a micrometer screw gauge. While the smaller stud is referred to as an anvil, the longer stud is referred to as the spindle. The spindle moves as and when the head is moved whereas the anvil is the fixed part. The object is meant to be measured in place between the anvil and the spindle. The frame carries both the barrel and the anvil. The barrel or sleeve is a part that connects the frame to the non-movable cylindrical tube of the micrometer screw gauge with a scale inscribed over it. This scale is referred to as the main scale of the device.
The heart of the micrometer screw gauge is the screw that is located inside of the barrel. The screw helps to convert small dimensions of samples into measurable distances using the scale. The device also carries the head or thimble which is the end of the cylindrical tube that can be turned to move and adjust the spindle. The thimble is the part on which the secondary scale is displayed.
At the end of the tube is the ratchet which is a limiting device that applies pressure by slipping at a predetermined torque. As a result, it prevents the spindle from moving further. While there are vast varieties of micrometers for specific applications, some consist of locking devices. This locking device holds the scale at a specific measurement to prevent any kind of error while taking measurements.
Hence the main parts of a micrometer screw gauge as explained earlier include the following:
- “U” shape frame
- Anvil
- Spindle
- Sleeve
- Thimble
- Ratchet
- Screw
- Lock
How To Use A Micrometer?

The steps highlighted below are to be followed to ensure a proper use of a micrometer. The steps include the following:
- Acquaint yourself with the anatomy of the device. Some components are stationary while others are movable.
- Before taking the measurement, clean the anvil and spindle: this step isn’t necessary but it is proper to keep the surface of the anvil and spindle clean to ensure precise measurement
- Hold your sample to be measured in the left hand and place it against the anvil. The anvil can withstand more pressure than the spindle since it is stationary.
- Hold the micrometer on your right hand while the frame rests gently on your palm. On a stationary wise, you can also fasten the frame to help you free up both hands during the process of measurement
- Spin the micrometer’s ratchet counter-clockwise: ensure that the zero on the thimble is lined up with the scale on the sleeve
- Twist it until the spindle is against the object. To achieve this, apply enough force and stop after three clicks of the thimble.
- Set the lock nut while the object is held by the micrometer.
- Slide-out the object carefully and ensure that either surface of the spindle and anvil is not scratched. This is because the slightest scratch can affect the accuracy of the device.
- Write down the measurement on both the primary and secondary scale before you unlock the spindle
How To Read A Micrometer?
For a machinist, manufacturer, engine professional, or many more, a precise and accurate measurement, are a must for their everyday activities. When it comes to the measurement of spherical and cylindrical samples, an outside micrometer is the ideal measuring device to be used. However, a well-calibrated micrometer may seem difficult to read, but with patience and constant practice, measurement with this device can become a part of your skillset. Below are the steps involved in reading a micrometer screw gauge:
Micrometer screw gauge features two scales including a rotating scale found on its rotating cylindrical component. It is also referred to as circular or secondary scale while the other scale found on its stationary sleeve is called the main scale or sleeve scale.
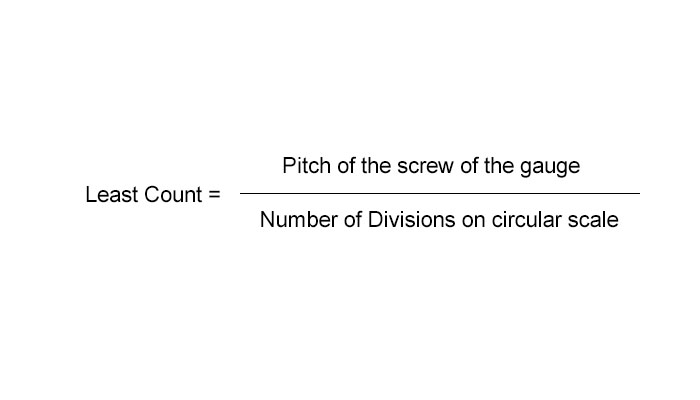
Generally, the least count is 0.5 mm on the main scale while the circular scale is divided into 50 or 100 equal parts.
Least Count
The least count is the minimum length that can be measured using the veneer calipers.
Micrometer Screw Gauge Zero Errors
The micrometer screw gauge features a spindle and anvil which are fashioned to touch each other so that the zero on the main scale should match the zero on the circular scale. However, if the zero on both scales fails to coincide then the micrometer screw gauge is said to exhibit zero error. This zero error of micrometer may be attributed to wear and tear or manufacturing defects. Generally, there are two types of zero errors, they include:
- Positive Zero Error
To identify the positive error, the zero mark of the circular scale lies below the zero marks of the main scale. Obtaining the positive error requires taking note of the division on the circular scale reading (C.S.R) that coincides with the line of the main scale. Due to this, the positive error is then equal to the product of the least count of the micrometer screw gauge and the number of divisions on the circular scale matching with the main scale line. To avoid errors in the reading, this error is subtracted from the overall reading.
- Negative Zero Error
To identify the negative, the zero mark of the circular scale lies above the zero marks of the main scale. Obtaining the negative error requires taking note of the division on the circular scale (C.S.R) that coincides with the line of the main scale. Due to this, the negative error is then equal to the product of the least count of the micrometer screw gauge and the number of divisions on the circular scale matching with the main scale line. To avoid errors in the reading, this error is added to the overall reading.
Since you have been able to understand the phenomenon explained above, then proceed to the reading. The following are the steps involved:
- Place the object to be measured between the spindle and the anvil of the micrometer screw gauge
- Take note of the main scale reading displayed on the main scale just before the zero marks of the circular scale. This reading is denoted M.S.R (main scale reading)
- Take note of the number of circular divisions (n) that coincide with the line of the main scale. The C.S.R (Circular Scale Reading) = (n) X Least Count
- To obtain the expected reading, add M.S.R to the C.S.R
- To get the final reading, subtract the zero error with a proper sign from the reading obtained in step four above
Summary
For over 150 years, the micrometer has evolved to keep with the demand of tight tolerances and high-speed production at the point of production in the manufacturing industry.
It has been a useful device in precise measurement with great potentials in vast varieties of applications. The micrometer screw gauge is highly durable and is cost-effective and its measurement is reliable. Consider its usage for more precise measurement today either in CNC machining, mechanical engineering, and many more.
