13 tipi di porte per lo stampaggio a iniezione
Injection molding is one of the most common manufacturing processes for producing plastic parts. A crucial element in this process is the injection molding gate, which controls how molten plastic enters the mold cavity.
In this blog, you’ll learn about different types of injection molding gates, why they matter, and how to choose the right one.
What is an Injection Molding Gate?
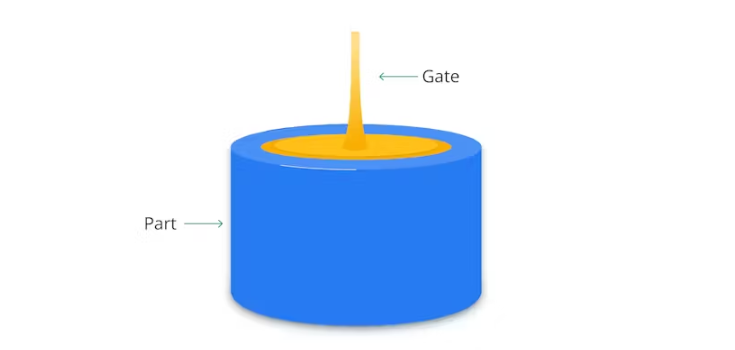
An injection molding gate is a small opening that lets melted plastic flow into the mold. It connects the mold cavity to the main plastic supply and controls how fast and how much plastic moves through. The way the gate is designed affects the final product’s quality.
Gates come in different sizes, shapes, and positions, depending on the design of the product.
Why Do You Need Injection Mold Gate Design?
The design of an injection molding gate affects how well a plastic mold turns out. A good gate controls how much and where the melted plastic flows into the mold. You don’t want the plastic moving back toward the runner or nozzle instead of filling the mold properly.
The gate also makes sure the plastic spreads evenly before it cools. This prevents some areas from hardening too soon, which could cause defects like cracks or weak spots.
Additionally, the gate generates heat, which helps keep the plastic at the right temperatura. This prevents flow marks and weak connection points (weld lines) from forming. With a well-designed gate, manufacturers can even remove extra plastic channels (runners) to make finishing the product easier.
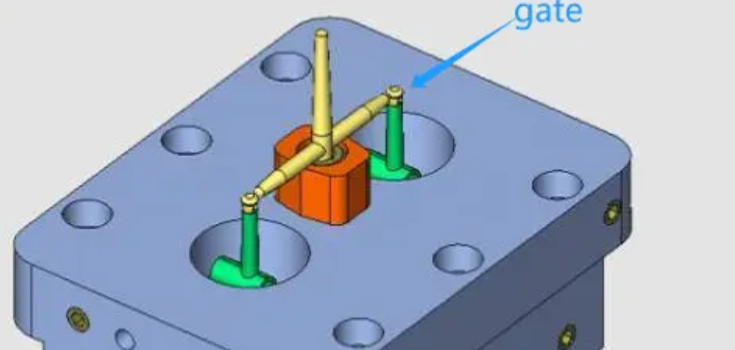
Importance of Gate Location in Injection Molding
In injection molding, the gate is a small opening between the runner and the mold cavity. The size of the gate is important, but where you place it matters even more for making good-quality parts.
Choosing the right gate location helps avoid problems caused by size mistakes. If you put the gate in the wrong spot, you might get defects like extra material (flash), weak areas, cracks, or uneven thickness. Picking the best gate location ensures the right size and timing for a smooth injection molding process.
Manual vs. Automatically Trimmed Gates
After each production cycle, the molded part must be separated from the runner. This can be done manually by a worker or automatically by the mold design.
If you use manually trimmed gates, a worker has to cut off the excess material after each cycle. This takes more time, increases labor costs, and can lead to variations in cycle times. On the other hand, automatically trimmed gates don’t need human involvement. Instead, the mold design shears off the extra material when the part is ejected.
It might seem like automatic trimming is always better, but that’s not always true. Some gates, especially thicker ones, need to be trimmed manually. Automatic trimming can damage them because of the shearing force.
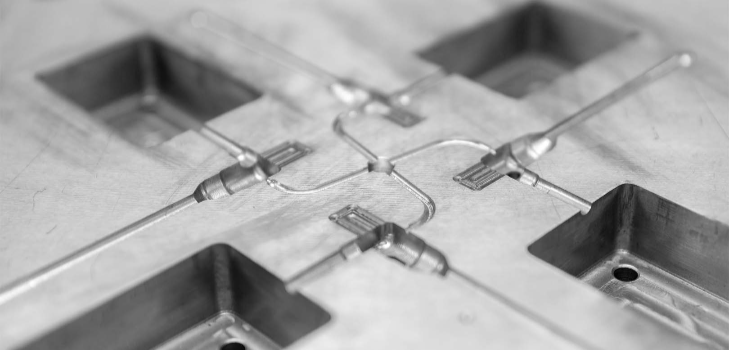
Types of Injection Molding Gates
Each type of injection molding gate has its own advantages and disadvantages. Here are some common injection gate types:
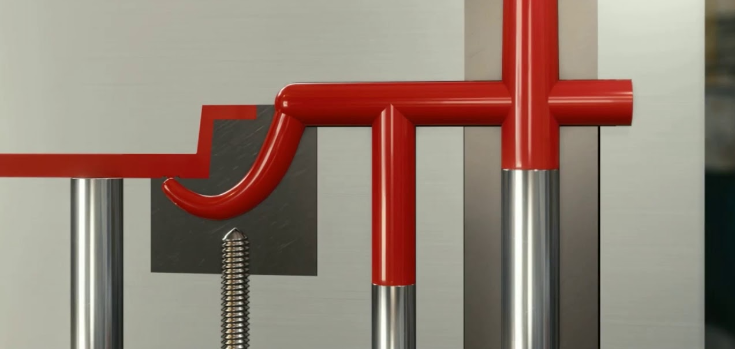
Sprue Gate (Direct Gate)
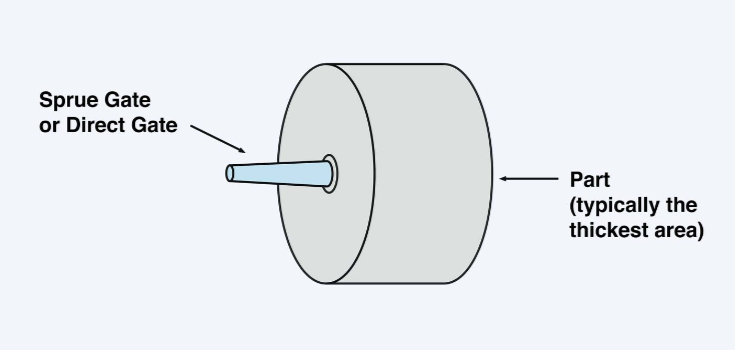
This is the most basic type of gate. It connects the sprue (the main channel) directly to the molded part. Since it has a large opening, it creates strong parts but may leave visible marks. It’s best for simple, non-decorative parts.
Edge Gate
As the name suggests, this gate is placed on the edge of the part. It works well for flat parts with medium or thick sections. This design gives the plastic more time to fill the mold and is easy to modify, so it is a cost-effective option.
Submarine Gate
This gate is placed just under the parting line of the mold. It’s often used for small plastic parts, especially in electronics and automotive products, because it leaves very little visible marking. The gate is automatically removed when the part is ejected, which is why the production is faster.
Fan Gate
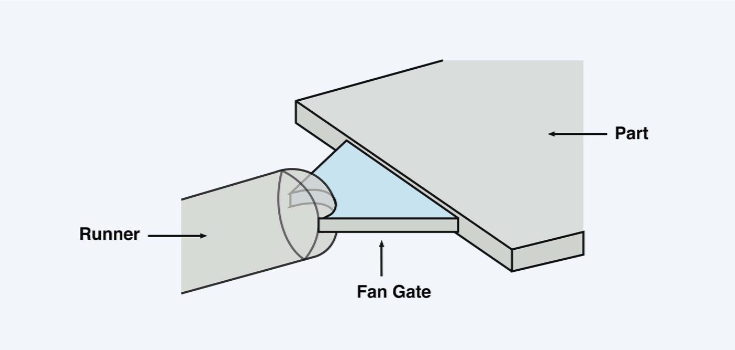
Like the edge gate, this one is also placed along the parting line but has a wider, fan-like opening. It spreads the plastic more evenly. It is a good choice for large or delicate parts. However, it may not be ideal for complex shapes due to uneven filling.
Film Gate (Flash Gate)
This gate has a long, thin opening, which helps the plastic flow smoothly into the mold. It’s great for large, thin-walled parts and prevents stress or warping.
Tab Gate
A variation of the edge gate, this type is useful for thin, flat parts. It helps reduce stress in the mold by carrying the force of the plastic flow. After molding, the tab is removed.
Pin Gate
A pin gate is a small pin-shaped opening (0.5mm to 2mm in diameter). It allows controlled plastic flow and results in a high-quality finitura superficiale. This gate type reduces the need for extra finishing and speeds up production.
Cashew Gate (Banana Gate)
This gate has a curved shape like a cashew or a banana. It’s placed below the parting line and is designed to remove itself automatically when the part is ejected. This makes it ideal for high-volume production.
Hot Tip Gate
Used for round or cone-shaped parts, this gate is placed at the top of the mold. It delivers molten plastic directly to the part and leaves a small raised mark.
Hot Runner Thermal Gate
This is a more advanced system that uses heated channels instead of traditional cold runners. It delivers molten plastic directly from the injection machine to the mold, reducing material waste.
Diaphragm Gate
This gate is shaped like a ring and is used for hollow or cylindrical parts. It ensures the plastic flows evenly around a core. It is ideal for parts that need perfect symmetry.
Spoke Gate (Four-Point Gate)
This gate has four openings placed at right angles, like the spokes of a wheel. It’s used for making tubular plastic parts and ensures an even flow of plastic.
Ring Gate
In this design, the molten plastic first fills the center core before spreading outward. It’s commonly used for making cylindrical parts and provides strong inner support.
Considerations for Injection Molding Gate
To make sure the plastic flows evenly and quickly, keep these things in mind:
Gate Size
The size of the gate affects how the plastic flows into the mold and how easy it is to remove the finished part. It also impacts production costs.
Here’s what you should remember:
- The gate is usually smaller than the part and the runner.
- If the gate is too big, it can cause pressure drops and distort the part.
- If the gate is too small, it can block the flow and lead to an incomplete mold.
Injection Molding Gate Location
Where you place the gate affects the way the plastic moves through the mold and the final product’s quality. Proper gate placement helps prevent defects like weld lines and uneven packing.
Follow these tips when choosing a gate location:
- Place the gate where it can be easily removed, either manually or automatically.
- Avoid placing it near obstacles like pins or cores, which can cause weld marks.
- Put the gate in the thickest section of the part to prevent voids and sink marks.
- Choose a spot that won’t affect the part’s appearance or function.
- Use multiple gates for thin-walled parts to ensure even filling.
Number of Gates
The number of gates impacts cost, quality, and production time.
For larger parts, one gate may not be enough. In that case, you may need multiple gates to avoid bottlenecks in thin areas. A single, larger gate isn’t always a good solution because it can create defects.
Consider these factors when deciding how many gates to use:
- Production needs
- The shape and size of the part
- The type of plastic being used
Part Shape and Finish
The right gate depends on the shape and finish of your part. Some gates work well for rough, simple shapes, while others are better for smooth, detailed parts.
Sometimes, you may need to do additional finishing, like sanding, to achieve the desired look.
How Hot and Cold Runners Affect Gate Systems
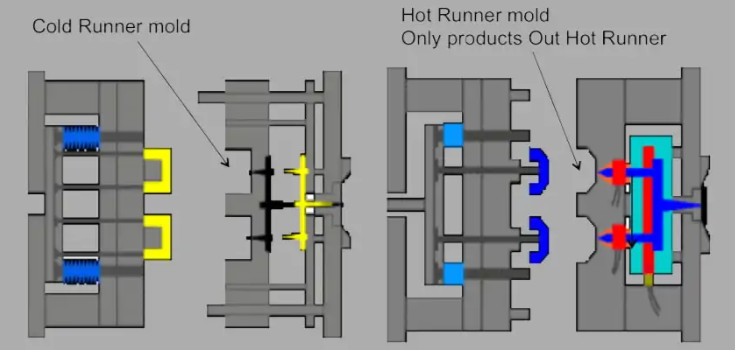
Gating systems change depending on whether you use hot or cold runners. Hot runners have more benefits than cold runners, but they make tooling more expensive. You usually use hot runners for production or when a part is complex and needs multiple injection points to fill evenly.
With a thermal gate system, the leftover mark (vestige) looks like a small point inside a shallow dent. Some hot runner systems use valve gates, which allow more material to flow and leave less of a mark. Since hot runners keep the material melted and under the right pressure between cycles, they reduce waste.
Hot runners can be a single drop, combined with other runner systems, or part of a custom manifold. This gives you the most control when molding parts.
Improve Your Injection Molding Gates with DEK
A DEK, we have the knowledge and experience to help you optimize your injection mold gates. You can explore our injection molding services to see how we can support your project. Whether you’re new to injection molding or have been doing it for years, we’re here to help you get high-quality parts on time. Contact us and get a free quote today!
Conclusione
Injection molding gates do more than just control how plastic fills a mold. They also affect the cost of your tools, the time it takes to make each part, and the final quality of your product.
If you’re a designer or engineer, it’s important to know how to improve the gates that connect sprues and runners to the mold cavities. The type of gate, how it’s trimmed, where it’s placed, its size, and its shape all play a big role in how well your parts turn out.
Domande frequenti
Why does gate type and gate placement matter?
Gate placement controls where material enters, and gate type affects flow. Both impact the final part.
A small gate can cause high pressure, leading to defects like jetting (wavy marks). Gates also leave marks, so avoid visible areas. Place them near thick sections for better flow and away from pins and cores to prevent defects.
Where do you place the gate in injection molding?
You should place the gate in the thickest part of the mold to help the plastic flow smoothly and avoid air pockets or sinking. It’s best to put the gate on one side of the mold where it won’t affect the strength or shape of the part.
What are the main steps of injection molding?
Injection molding has four main steps. First, the mold closes tightly in the clamping stage. Next, melted plastic is injected into the mold. Then, the plastic cools and hardens into shape. Finally, the finished part is ejected from the mold.
What are the common problems in injection molding?
There are several common problems in injection molding. Sink marks are small dents or dips on the surface. Flow lines are wavy patterns caused by uneven cooling. Warping happens when parts bend or twist out of shape. Surface delamination occurs when layers peel off the part.
Short shots happen when the mold does not fill completely. Jetting creates thin, snake-like lines when plastic flows too fast.
