How to Avoid Flash in Injection Molding: Causes and Tips
Flash in injection molding can be a major issue. It affects the quality of your parts and increases production costs.
This blog will help you learn how to avoid flash in injection molding by identifying its causes and providing practical solutions.
What is Flash in Injection Molding?
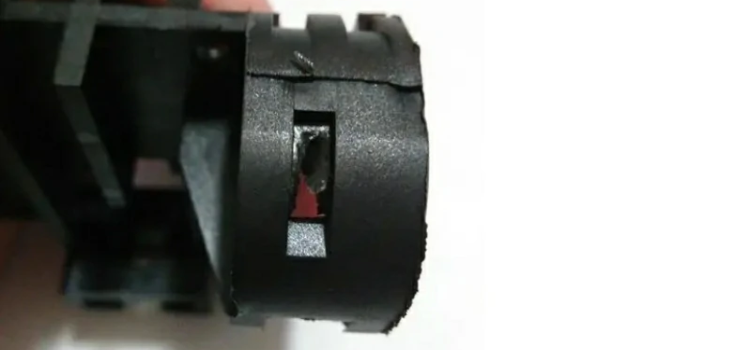
Flash happens in injection molding when extra plastic leaks out of the mold and hardens on the edges of a part. This usually happens at the parting line (where the two halves of the mold meet), but it can also occur in other areas.
Flash is caused by things like high injection pressure, too much material, or gaps in the mold. It can make the part look bad or affect its function. If not removed, it can even damage the mold. That’s why flash needs to be trimmed off in both small and large production runs.
What Causes Flash in Injection Molding?
Here are some common reasons why this can happen:
Parting Line Mismatches
The parting line is where the two halves of the mold meet. If they don’t line up correctly because of dirt or a poor design, the mold won’t seal properly. This can let hot plastic leak out during injection.
Improper Venting
Air needs to escape from the mold when the plastic is injected. If the mold doesn’t have enough vents or they are clogged, air can get trapped. This trapped air increases pressure and pushes plastic out, causing flash.
Clamping Pressure Issues
The mold needs strong clamping pressure to stay closed during injection. If the pressure is too low, the plastic inside can force the mold open slightly, leading to flash.
Sprue Bushing Issues
The sprue bushing is a part of the mold that helps move the hot plastic into the cavity. Over time, it can wear out and become weak. When this happens, it may not handle the injection pressure properly. This can cause defects in your molded parts, and one of the most common problems is flash.
Low Viscosity
Viscosity is how easily the melted plastic flows. If the plastic is too thin, it can easily leak out of small gaps in the mold, causing flash. The temperature and pressure of the plastic can also affect viscosity.
Overfilling the Mold
If too much plastic is injected into the mold, it creates extra pressure. This pressure can push plastic out of the mold, leading to flash on the final part.
Barrel and Nozzle Temperature
The temperature of the barrel and nozzle affects how the plastic flows. If the temperature is too high, the plastic becomes too thin and leaks out of small gaps in the mold. This can cause a flash.
Высокое давление
Too much pressure inside the mold can push plastic out, causing flash. High pressure also increases heat, which affects how the plastic flows and makes defects more likely.
Overpacking
If the mold has small or complex pathways, plastic can get stuck and block the flow. This creates extra pressure inside the mold, leading to flash and other problems like warping and uneven thickness.
Ways to Fix Flash in Injection Molding Process

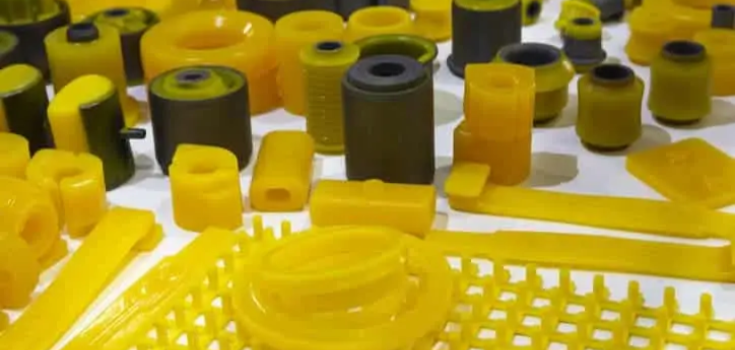
You can’t always stop flash from happening, but you can remove it after molding. This process is called deflashing. Soft materials like silicone rubber are easier to deflash, but you can also remove flash from hard plastics.
Here are some common solutions to fix flash:
Using Hot Air
You can melt thin flash back into the part using hot air. This works best for small, fine flashes. However, if the flash is thick, hot air may not work well and could make the part look bad. It’s best to use hot air after removing most of the flash by other methods.
Cryogenic Deflashing
This is one of the best ways to remove flash. The part is cooled with liquid nitrogen until the flash becomes brittle and easy to remove. This method keeps the part looking smooth, but the machines for cryogenic deflashing can be expensive.
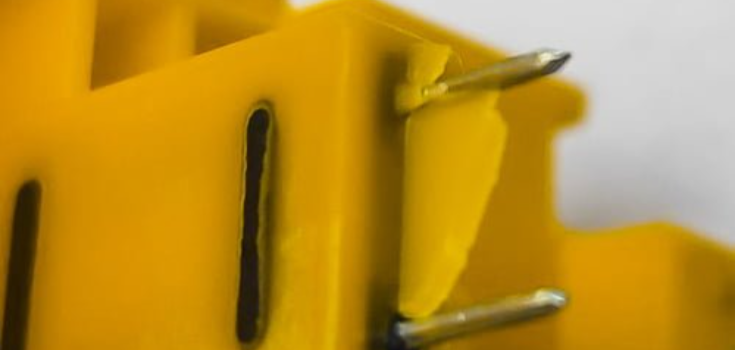
Manual Deflashing
This method is simple and works on many materials. You use tools like scissors, knives, or grinders to cut away the flash. It gives good results if done carefully and allows you to check the part while deflashing. However, it takes time and depends on the skill of the person doing it.
Using Open Flame
You can use a flame to burn off flash, but this can change the surface of the part. It may make the plastic look worse and harder to paint or finish later. This method is not the best for high-quality parts.
How to Avoid Flash in Injection Molding?
Instead of fixing flash after it happens, it’s better to stop it before it starts. Here are some easy ways to prevent flash in injection molding:
Keep the Mold Clean
Dirt and leftover plastic can stop the mold from closing properly, which can cause a flash. Before molding, clean the mold using a rag, mold cleaner, and compressed air. Check carefully for small plastic pieces hiding in tight spots like slides and leader pin pockets.
Use the Right Clamping Force
The mold needs enough pressure to stay shut, but too much force can damage the mold or the final part. Make sure you use the correct clamping force to avoid flash and other problems.
Design for Manufacturability (DFM)
A good design makes it easier to mold parts without flash. Follow design rules that help reduce costs, speed up production, and improve quality. Pay attention to details like gate placement, wall thickness, hole positions, and parting lines. This is especially important when making prototypes or complex parts with undercuts.
Use a Flash-free Mold
Some molds are made to prevent flash completely. These molds have very tight tolerances and work well for parts that need a perfect finish. However, they can be expensive, so they may not be the best choice for every project.
Slow Down the Injection Speed
If the plastic is injected too fast, it increases pressure and makes flash more likely. Slowing down the injection speed reduces this risk. However, keep in mind that a slower injection speed also makes the cycle time longer.
Using "Moats" for Easy Removal of Flash
When making simple shapes or using thick plastics like HDPE, flash isn’t a big problem. But with very liquid-like materials like liquid silicone rubber (LSR), flash always happens. To fix this, we design molds with “tear strips” that work like a moat around a castle. These small channels collect extra material, and they make it easy to tear off the flash after molding.
Other Injection Molding Defects
Besides flash, other problems can happen during литьё под давлением. Here are some common ones you might see:
Weld Lines
Weld lines appear when two or more plastic flows meet but don’t fully bond because they start to harden too soon. This happens when the temperature or pressure is too low. To fix it, increase the pressure and temperature. You can also adjust the wall thickness to change how the plastic fills the mold.
Cracking
Cracks often appear near weld lines but can also form anywhere on the part. They are usually caused by stress, cold mold surfaces, or slow injection speed. To prevent cracking, increase the injection speed and raise the mold temperature.
Surface Delamination
This happens when the surface of the molded part flakes or peels off, often near the gate area. The main cause is contaminated material, but it can also happen if moisture in the plastic turns to steam during molding. To prevent this, make sure the material is clean and dry before using it.
Flow Lines
Flow lines look like wavy or ring-shaped marks on the plastic. These can make the part look bad or even affect how it works. They happen when plastic cools at different rates as it moves through the mold. To avoid flow lines, increase the injection speed and molding pressure, and make sure the plastic is at the right temperature before filling the mold.
Jetting
Jetting happens when the first bit of plastic entering the mold starts to harden before the whole cavity is filled. This creates a streaky or uneven look. To prevent jetting, lower the injection pressure and increase the temperature of the plastic so it flows more smoothly.
DEK for Best Injection Molding Services
DEK is a top provider of injection molding services. We are focused on making strong, high-quality parts that look great. We make sure your parts are ready on time and within budget.
Our experts use advanced equipment and techniques to ensure every part is made with precision. With our ISO-certified quality checks, you can trust that your project will meet your exact needs.
Upload your design today to get a free quote and feedback on your design!
Заключение
Flash in injection molding can be a problem, but you can stop it before it happens. Keep your mold clean, use the right pressure, and control how fast the plastic flows. If flash does appear, you can remove it with cutting tools, hot air, or freezing methods. By following these steps, you can make better parts and save time and money.
ЧАСТО ЗАДАВАЕМЫЕ ВОПРОСЫ
How can you stop flash in injection molding?
The best way is to slow down the injection speed. This lowers the pressure and makes the plastic flow better. You can also increase the clamping pressure to keep the mold tightly closed.
Which is better: hot air or cryogenic deflashing?
It depends on the type of flash. Both work well for big flashes. Cryogenic deflashing is good because it doesn’t use heat. But hot air can melt the flash back into the part, so it’s better for small or fine flashes.
What causes mold flash?
Flash happens when melted plastic leaks out at the mold’s parting line. This usually happens because of high injection pressure or weak mold design.
